
Changing the batteries in your Blink Doorbell is an essential maintenance task that ensures your device remains operational and effective in securing your home.

Whether your Blink Doorbell has started showing low battery notifications or you’re preparing for the inevitable, understanding the process can save you time and frustration.
This guide will walk you through how to change batteries in blink doorbell, ensuring your doorbell camera continues to function optimally. With the right tools and a few minutes, you can extend the lifespan of your device and maintain its reliability.
From gathering the necessary materials to reassembling your doorbell, we’ll cover each step in detail, providing tips to avoid common pitfalls and maximize battery life. Keep your home security system running smoothly by mastering this straightforward yet crucial task.
The Importance of Maintaining Power for the Blink Doorbell
Maintaining power for your Blink Doorbell is crucial for uninterrupted home security. A fully operational doorbell ensures you never miss a visitor, delivery, or potential security threat.
When your device is consistently powered, it can efficiently record and alert you to movements and activity at your doorstep, providing peace of mind and enhanced home protection. Low or depleted batteries can lead to lapses in this monitoring, potentially leaving your home vulnerable.
Regularly checking and changing the batteries helps in maintaining the reliability of the motion sensors and video feed, ensuring that the system functions optimally, especially during critical moments.
Prioritizing battery maintenance translates to a consistently secure household, where the technology you depend on is always ready to perform.
The Need for Periodic Battery Replacement
Periodic battery replacement is a key aspect of maintaining the functionality and efficacy of your Blink Doorbell. Over time, batteries naturally degrade and lose their ability to hold a charge, which can compromise the performance of the doorbell.
By ensuring that you replace the batteries periodically, you can prevent unexpected downtimes that may occur due to battery failure. Moreover, regular battery replacement helps avoid inconvenience and ensures that your doorbell remains responsive at all times.
With the right timing and practice, you can make battery changes a part of your routine home maintenance, thereby safeguarding the reliability of your security system. Consistent battery care extends the lifespan of your Blink Doorbell and contributes to a seamless, dependable home security experience.
Understanding Blink Doorbell Batteries

The Blink Doorbell is designed to run on two AA lithium batteries, chosen for their long life and reliability under various environmental conditions.
Lithium batteries are preferred over alkaline due to their superior performance in both extreme hot and cold temperatures, ensuring your doorbell remains functional year-round.
These batteries not only provide a longer operational life but also deliver a more consistent power output, which is essential for the doorbell’s video recording and motion detection features.
It’s important to note that while lithium batteries offer enhanced performance, they should be handled with care and replaced safely.
Understanding the type and characteristics of these batteries can help you make informed choices when it’s time for replacement, ensuring that your Blink Doorbell continues to operate efficiently and reliably.
Battery Type Used in Blink Doorbells
The Blink Doorbell utilizes two AA lithium batteries, renowned for their durability and superior performance compared to standard alkaline batteries.
Lithium batteries are the preferred choice due to their ability to function optimally in a wide range of temperatures, from the sweltering heat of summer to the icy chill of winter. This temperature resilience ensures that your Blink Doorbell remains operational no matter the season.
Additionally, lithium batteries offer a longer lifespan, reducing the frequency of replacements and ensuring that your security system maintains continuous operation.

The consistent power output provided by lithium batteries is crucial for the effective functioning of the doorbell’s features, such as video recording and motion detection.
Therefore, when it comes to maintaining your Blink Doorbell, opting for high-quality lithium batteries is an investment in uninterrupted security and reliability.
Battery Life Expectancy
Battery life expectancy in the Blink Doorbell is a critical factor to consider for uninterrupted security coverage.
With the use of high-quality AA lithium batteries, you can typically expect a lifespan of up to two years under standard usage conditions.
This impressive longevity is due to the efficient power management system built into the doorbell, which optimizes energy consumption based on usage patterns and activity levels.
However, various factors such as extreme weather conditions, high traffic areas with frequent motion detection, and extensive use of video recording can impact battery life.
Regular monitoring of battery status through the Blink app helps in preemptive replacements, ensuring that your doorbell never experiences a power lapse. Being proactive about battery replacement not only secures your home effectively but also aids in maintaining the overall health and performance of the device.
Preparing for Battery Replacement
Preparing for a battery replacement in your Blink Doorbell is a straightforward yet essential task to ensure its optimal performance.

Start by gathering the necessary tools: typically, a small Phillips head screwdriver and a set of replacement AA lithium batteries. Before beginning, make sure your doorbell system is disarmed to avoid any accidental alerts during the process.
It’s a good practice to review any instructional materials or user manuals provided by Blink for specific guidelines related to your model.
Once you have your tools and new batteries ready, it’s also advisable to check the latest battery status via the Blink app. This lets you confirm that it’s indeed time for a replacement and not an issue that could be resolved through other means.
Selecting a well-lit area to perform the battery change can help you clearly see and handle the small parts involved, reducing the risk of errors or losing components.
With these preparations in place, you’re now ready to proceed with the actual steps of replacing the batteries, ensuring your Blink Doorbell continues to function effectively without interruption.
10 Methods How to Change Batteries in Blink Doorbell
Method 1: Preparation and Safety First
Before beginning the battery replacement process, it’s crucial to prepare adequately and prioritize safety.
Start by gathering all necessary tools and materials, such as the new batteries (typically AA lithium batteries), a screwdriver, and a small cloth. Ensure the doorbell is disarmed to prevent any accidental triggers or alerts during the process.
This can be done through the Blink app by disabling the doorbell temporarily. Preparation also includes selecting a suitable workspace where you can comfortably access the doorbell, preferably during daylight hours to ensure good visibility.

Wearing rubber gloves is recommended to protect both your hands and the electronic components from static discharge.
Method 2: Accessing the Doorbell Unit
To change the batteries, you need to access the doorbell unit mounted outside your home. Begin by locating the doorbell and identifying the screws or mounting mechanism that holds it in place.
Most Blink Doorbells are designed with security screws to prevent tampering. Using the appropriate screwdriver, carefully remove the screws and place them in a safe spot to avoid losing them.
Once the screws are removed, gently pull the doorbell unit away from the wall. Be cautious of any wiring or clips that might be attached, as excessive force could damage these components.
Method 3: Opening the Battery Compartment
With the doorbell unit in hand, locate the battery compartment. This is usually found on the back or underside of the device. The compartment is typically secured with a small latch or additional screws.
Use the screwdriver or your fingers to release the latch or unscrew the cover. Open the battery compartment carefully to avoid any internal damage. If the cover seems stuck, avoid using excessive force and instead check for any hidden screws or latches that might still be securing it.
Method 4: Removing the Old Batteries
After opening the battery compartment, you will see the old batteries. To remove them, gently lift each battery out of its slot. Pay attention to the orientation of the batteries, noting the positive and negative ends.
It’s essential to handle the old batteries carefully, as they may have leaked or corroded over time.
Place the old batteries in a container for proper disposal. Many local recycling centers or electronic stores offer battery recycling services, which is an environmentally responsible way to dispose of used batteries.
Method 5: Inspecting the Battery Compartment
Before inserting new batteries, take a moment to inspect the battery compartment for any signs of damage or corrosion. If you notice any corrosion (white or greenish residue), use a small cloth or a cotton swab dipped in vinegar or lemon juice to clean the affected area.

Allow the compartment to dry completely before proceeding. Inspecting the compartment also includes checking for any loose connections or broken parts that might affect the performance of the doorbell. If you find any significant damage, consider contacting Blink customer support for further assistance.
Method 6: Inserting the New Batteries
Now, take the new AA lithium batteries and insert them into the battery compartment, following the orientation marked inside the compartment. Ensure that the positive (+) and negative (-) ends of the batteries match the corresponding symbols. Insert the batteries one at a time, pressing them firmly into place.
Proper insertion is crucial for the doorbell to function correctly. Lithium batteries are recommended due to their longer lifespan and better performance in extreme temperatures compared to alkaline batteries.
Method 7: Securing the Battery Compartment
Once the new batteries are in place, close the battery compartment by securing the latch or screwing the cover back on. Make sure the compartment is tightly closed to protect the batteries from environmental factors such as moisture and dust.
If the compartment cover has a gasket or seal, ensure it is properly aligned to maintain the doorbell’s weather resistance. After securing the battery compartment, give the doorbell a gentle shake to confirm that the batteries are firmly in place and there are no loose components.
Method 8: Reattaching the Doorbell Unit
With the new batteries installed and the battery compartment securely closed, it’s time to reattach the doorbell unit to its mounting bracket. Align the doorbell with the bracket and gently press it into place. Reinsert the screws you previously removed, tightening them with the screwdriver.
Be careful not to overtighten, as this could strip the screws or damage the mounting bracket. Ensure the doorbell is securely attached and sits flush against the wall to maintain its aesthetic and functional integrity.
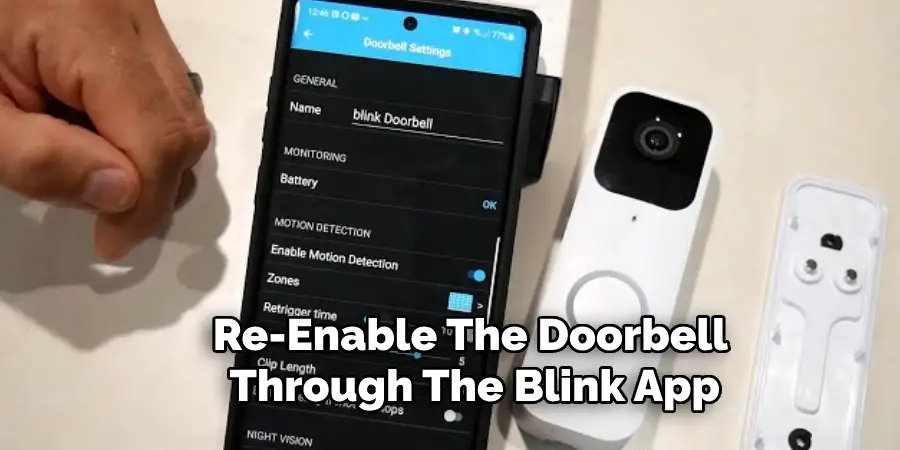
Method 9: Testing the Doorbell
After reattaching the doorbell, the next step is to test its functionality. Re-enable the doorbell through the Blink app if you had previously disarmed it. Press the doorbell button to ensure it rings and sends a notification to your smartphone.
Check the video feed to confirm that the camera is working correctly and that the audio is clear. Testing the doorbell ensures that the new batteries are properly installed and that the device is functioning as expected. If you encounter any issues, revisit the previous steps to check for any mistakes or loose connections.
Method 10: Regular Maintenance and Monitoring
Changing the batteries is just one aspect of maintaining your Blink Doorbell.
To ensure long-term performance, establish a routine for regular maintenance. This includes periodically checking the battery level through the Blink app, especially in extreme weather conditions that might drain the batteries faster.
Clean the doorbell unit and the surrounding area to prevent dust and debris from interfering with its operation.
Additionally, keep the firmware updated by checking for updates in the Blink app, as this can enhance the device’s functionality and security features. Regular maintenance and monitoring will help you catch potential issues early and extend the lifespan of your Blink Doorbell.
Things to Consider When Changing the Batteries
When changing the batteries in your Blink Doorbell, there are several important factors to keep in mind to ensure a smooth and effective process:

- Battery Type: Always use the recommended battery type for your Blink Doorbell. Typically, AA lithium batteries are advised due to their long lifespan and superior performance in various temperature conditions. Avoid using alkaline or rechargeable batteries, as they may not provide the necessary power and could reduce the device’s efficiency.
- Safety Precautions: Handling batteries requires careful attention to safety. Wear gloves to protect your hands from any potential leakage or corrosion. Additionally, ensure the work area is dry and free from any conductive materials to avoid short circuits.
- Proper Disposal of Old Batteries: Do not throw old batteries in the trash. Battery disposal should be done according to local regulations, which often involve taking them to a recycling center or a designated drop-off location that handles electronic waste.
- Environmental Conditions: Consider the environmental conditions where the doorbell is installed. Extreme temperatures, high humidity, and direct sunlight can affect battery performance and lifespan. If possible, provide some shade or weather protection for your doorbell.
- Backup Power: If security is a primary concern, think about having a backup power source during the battery replacement process. This could involve using a secondary security device, such as an additional door camera or alarm system, to ensure your home remains protected while the doorbell is temporarily out of service.
Common Mistakes to Avoid
When changing the batteries in your Blink Doorbell, being aware of common mistakes can save you time and trouble. Here are some frequent errors to watch out for:
- Using Incorrect Battery Types: One of the most common mistakes is using the wrong type of batteries. As emphasized earlier, AA lithium batteries are recommended for Blink Doorbells. Using alkaline or rechargeable batteries can compromise performance and shorten the device’s lifespan.
- Not Securing the Battery Compartment Properly: Ensure the battery compartment is securely closed after replacing the batteries. An improperly sealed compartment can allow moisture and dust to enter, potentially damaging the internal components and affecting the doorbell’s functionality.
- Forgetting to Reenable the Doorbell: After changing the batteries and reattaching the unit, don’t forget to reenable the doorbell through the Blink app. Skipping this step can lead to confusion and missed notifications, undermining the doorbell’s purpose.
- Overtightening Screws: It’s natural to want to make sure everything is tightly secured, but overtightening the screws can cause damage. This might strip the screws or break the mounting bracket, leading to additional repairs and frustrations.
- Disregarding Safety Precautions: Handling batteries without proper safety measures can be hazardous. Ensure you wear gloves and work in a dry environment away from conductive materials to prevent short circuits or exposure to battery leakage.
Conclusion
In conclusion, changing the batteries in a Blink Doorbell involves several detailed steps, from preparation to reattachment and testing.
Each method outlined above ensures a thorough and effective battery replacement process, maintaining the doorbell’s performance and reliability. By following these steps carefully, you can ensure your Blink Doorbell continues to provide the security and convenience it was designed for.
Regular maintenance and monitoring further contribute to the longevity and effectiveness of the device, safeguarding your home and providing peace of mind.