
Are you tired of changing the batteries in your door lock constantly? It can be a hassle, especially when doing it frequently.
How to change battery on door lock is a simple yet essential maintenance task that ensures the continued functionality and security of your home. Over time, batteries can drain, potentially leaving you locked out if not replaced in a timely manner. This guide will walk you through the steps needed to change the battery on your electronic door lock, from gathering the necessary tools to safely disposing of the old battery.
By following these straightforward instructions, you can maintain the optimal performance of your door lock and avoid inconveniences associated with power loss. Let’s examine how to easily and efficiently replace the battery.
What Will You Need?
Before starting the process of changing your door lock battery, gather these items:
- New batteries (make sure they are the correct type and size for your door lock)
- Screwdriver
- Safety gloves (optional but recommended)
- Paper towel or cloth
Once you have all the necessary tools, you can begin changing the battery on your door lock.
10 Easy Steps on How to Change Battery on Door Lock
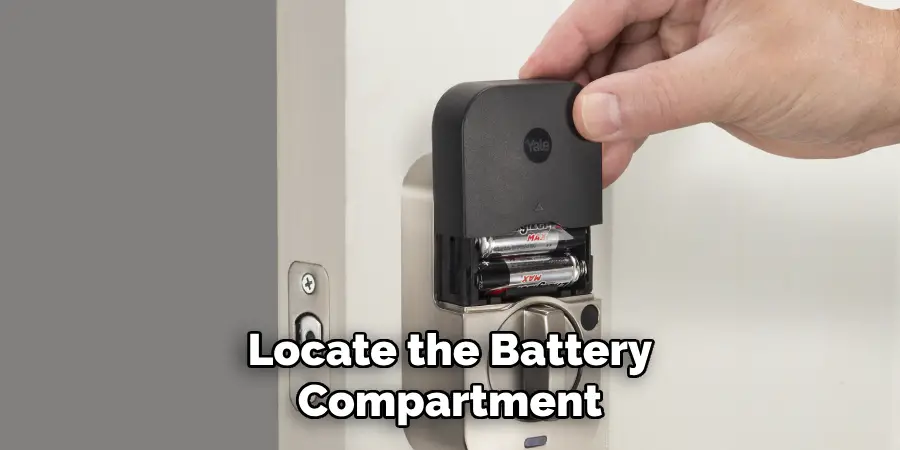
Step 1. Locate the Battery Compartment:
The first step in changing the battery of your door lock is to locate the battery compartment. This part is generally found on the interior side of the door lock. You may need to refer to your lock’s manual if you need clarification on its exact location, as different models may have variations in design. The battery compartment is typically situated above or behind the lock mechanism itself. Look for a panel or cover that can be easily removed or unscrewed to access the batteries. In some models, there might be a small screw securing the cover, which would require a screwdriver to open. Knowing this beforehand can save time and ensure you confidently approach the process.
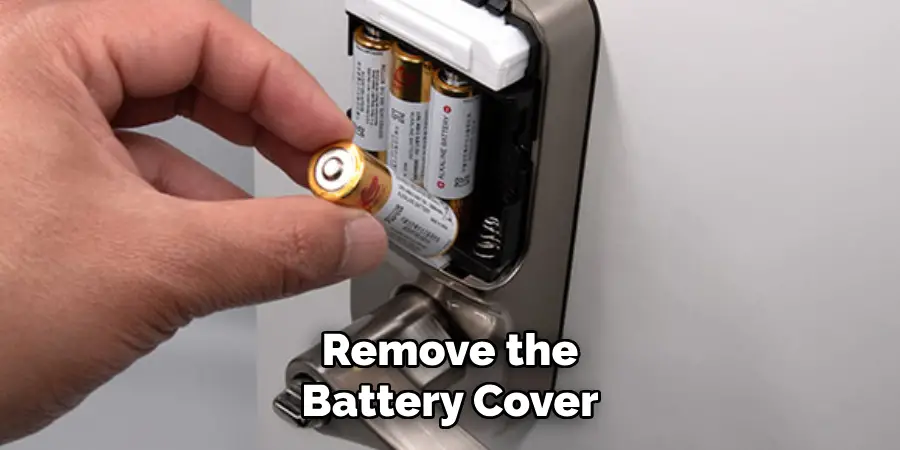
Step 2. Remove the Battery Cover:
Once you have located the battery compartment, the next step is to remove the battery cover. If screws secure the cover, use your screwdriver to carefully unscrew them and set them aside in a safe place to avoid losing them. If the cover is a simple slide or snap-on type, gently slide or lift it off, taking care not to force it, as this could damage the cover or lock mechanism. Removing the battery cover will expose the batteries inside, allowing you to proceed to the next step in replacing them.
Step 3. Remove the Old Batteries:
With the battery cover removed, you can now access the old batteries inside the compartment. Carefully take them out, noting their orientation, as you will need to insert the new batteries similarly. It’s essential to handle the old batteries cautiously to avoid any leakage, mainly if they have been used for a long time. If you wear safety gloves, continue using them to protect your hands. Set the old batteries aside for proper disposal later. Make sure the battery compartment is free of any dirt or residue, using a paper towel or cloth to wipe it clean if necessary before inserting the new batteries.
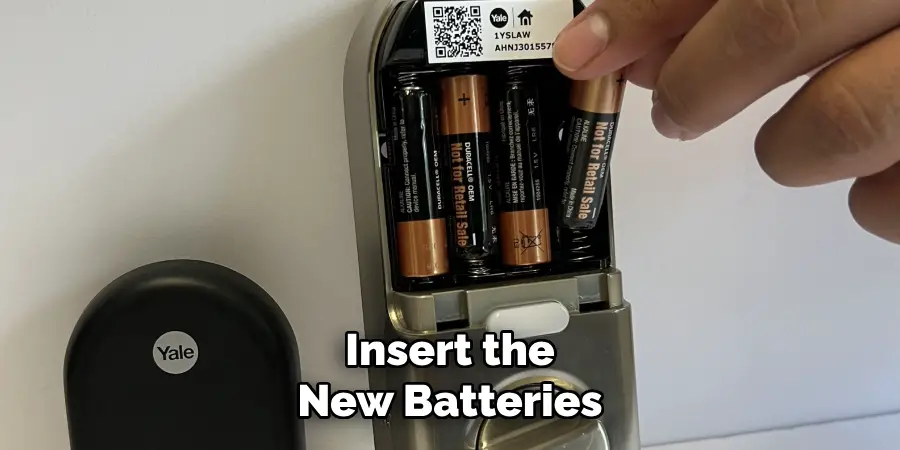
Step 4. Insert the New Batteries:
Take the new batteries and insert them into the battery compartment, ensuring they are oriented in the same direction as the old ones. Most battery compartments have plus (+) and minus (-) symbols to guide you. Matching these symbols with those on the batteries is essential to ensure a proper connection. Once you have inserted the new batteries, make sure they fit snugly and securely in place. Proper installation is crucial to guarantee your door lock’s functionality and avoid issues that can arise from improper battery placement.
Step 5. Replace the Battery Cover:
After successfully inserting the new batteries, it’s time to replace the battery cover. Align it properly over the compartment, ensuring it fits securely without any gaps. If your lock model uses screws to hold the cover in place, use your screwdriver to carefully tighten them, ensuring they are secure but not overly tightened, as this could strip the screw holes or damage the cover. For slide or snap-on type covers, gently push or snap the cover back into position. Confirm that the cover is fully secured before moving on, as an improperly attached cover could affect the lock’s operation.
Step 6. Test the Door Lock:
With the new batteries installed and the battery cover securely in place, testing the door lock to ensure everything is functioning correctly is essential. Begin by attempting to lock and unlock your door using the electronic controls. If your door lock features a keypad, enter your security code to confirm that the keypad is responsive and the lock operates smoothly. For smart locks, check that the lock connects to any associated apps or devices as expected. Performing these tests will help identify any issues early and ensure that your newly installed batteries are providing optimal power to the lock system.
Step 7. Dispose of Old Batteries Properly:
Proper disposal of old batteries is crucial for environmental protection. Gather the old batteries you removed from the door lock and place them in a container for safe transportation. Check with your local waste management or recycling center for guidelines on battery disposal in your area, as many places offer designated recycling programs for batteries. Avoid throwing them in regular trash as they contain substances that can harm the environment. By ensuring the batteries are disposed of responsibly, you contribute to environmental conservation and comply with safety regulations.
Step 8. Reset Your Smart Door Lock:
If you have a smart door lock, it may need to be reset or synchronized after the battery replacement. This process can vary depending on your lock’s specific brand and model, so it’s advisable to consult the user manual for detailed instructions. Generally, this may involve pressing a reset button or going through a setup menu in the lock’s app to ensure the new batteries are fully recognized and integrated with your existing settings. Completing this step will help maintain the connectivity and functionality of your smart lock features, providing seamless operation post-battery change.
Step 9. Regular Maintenance and Battery Replacement:
Establishing a regular maintenance routine is essential to ensure your door lock’s longevity and optimal performance. Aim to check the battery level at least once a year, or more frequently if your lock sees heavy usage, to prevent unexpected battery depletion. Some locks have indicators that signal when the battery is low, providing a timely reminder for replacement. Additionally, inspect the lock mechanism and clean the keypads, if applicable, to remove any dirt buildup that could affect functionality. Regular maintenance helps identify potential issues early, extending the lifespan of your locking system and ensuring reliable security for your home.
Step 10. Document Any Issues:
After completing the battery replacement process and ensuring that your door lock is functioning correctly, it’s helpful to document any issues encountered during the procedure. Keeping a record of troubleshooting steps and solutions can be a valuable reference for future maintenance or for sharing with others who may experience similar concerns. Note any unusual behavior, such as delayed response times or connectivity problems in smart locks, and indicate the actions taken to resolve them. Maintaining clear documentation ensures a smoother experience with future battery changes and can aid in effectively addressing any recurring issues.
By following these steps, you can quickly and safely replace the batteries in your door lock, ensuring its proper functionality and security.
5 Things You Should Avoid
- Using Incorrect Tools: Always ensure you have the right tools, such as a suitable screwdriver, to avoid damaging the lock or battery compartment.
- Forcing the Battery Cover: Avoid applying excessive force when removing the battery cover. Most covers have a specific release mechanism that requires gentle pressure to open.
- Mixing Old and New Batteries: Ensure all batteries used are new and from the same pack. Mixing old and new batteries can lead to leakage or uneven performance.
- Ignoring the Battery Orientation: Pay close attention to the polarity (+/-) markings in the battery compartment to avoid incorrect installation, which can damage the lock or prevent it from functioning.
- Skipping a Functionality Test: After replacing the batteries, always test the door lock multiple times to ensure it’s working correctly before securing the battery cover back in place.
By avoiding these common mistakes, you can ensure your door lock operates smoothly and efficiently.
Conclusion
Changing the battery on a door lock is straightforward when approached with care and attention to detail.
By using the correct tools and avoiding common mistakes, such as forcing the battery cover or mixing old and new batteries, you can maintain the lock’s integrity and performance. Properly orient the batteries and run a functionality test to confirm everything works as expected.
Hopefully, the article on how to change battery on door lock, along with the additional tips on what to avoid, has been helpful in guiding you through this simple but essential maintenance task.