
Are you locked out of your house? Did you forget the combination to your lock? In these situations, knowing how to jam a lock can come in handy.
Jamming a lock is an unconventional skill that could be useful in emergencies or for security purposes. It involves temporarily rendering a lock inoperable, preventing anyone from using a key to open it. This technique should be employed responsibly and legally, with complete awareness of the ethical implications.

Understanding how locks function is the first step in effectively jamming them, as different types of locks may require unique methods. Various tools and materials can be utilized, whether it’s a padlock or a door lock. Caution is advised, as improper handling could lead to unintentional damage or legal consequences.
What Will You Need?
To jam a lock, you will need some essential tools and materials. These may include:
- Screwdriver
- Hammer
- Drill and drill bits
- Super glue or epoxy
- Shims or thin pieces of metal
In addition to these items, it’s essential to have the owner’s permission before attempting to jam a lock, as tampering with someone else’s property without consent is illegal.
10 Easy Steps on How to Jam a Lock
Step 1: Assess the Lock Type
Before attempting to jam a lock, it’s crucial to assess the type of lock you are dealing with, as this will inform the method you choose to employ. Begin by identifying whether the lock is a padlock, deadbolt, or a more complex mechanism such as a combination lock. Examining the lock’s construction, materials, and any visible components can provide insight into its operations and vulnerabilities. Understanding the lock’s mechanism will also help you select the appropriate tools and techniques. For instance, a pin tumbler lock might require different tactics than a wafer tumbler lock. This careful assessment helps in deciding the best approach and minimizes the risk of causing irreversible damage or attracting unwanted attention.
Step 2: Gather Necessary Tools
Once you have assessed the lock type, gather the necessary tools and materials to jam it effectively. The specific tools required may vary depending on the lock’s design. Still, generally, you should have on hand a screwdriver suitable for any screws present, a hammer for creating force if needed, drill and drill bits for more stubborn mechanisms, and super glue or epoxy to seal the lock parts together. Shims or thin pieces of metal can be handy for maneuvering within the lock mechanism if required. Ensure you have a clean and organized workspace to keep your tools accessible and within reach during the process.

Step 3: Secure the Lock
Before proceeding to the more invasive steps, ensure that the lock is secured correctly to remain stable while you work. This might involve holding the lock with a vise or clamps to prevent it from moving, which could cause accidents or damage. Stability is crucial when applying force or using tools like drills. If the lock is attached to a door or a gate, ensure that the door is tightly closed or ask for assistance to hold it steady. Taking these precautions will not only make the task more accessible but also help maintain a safe working environment.
Step 4: Apply Force if Necessary
If the lock is still resistant after securing it, applying force may be required to compromise its mechanism. Use the hammer to deliver controlled taps to weaken vulnerable points or loosen tightly fitted components. Striking the lock in specific spots, such as around the shackle of a padlock, can help make it more susceptible to jamming techniques. However, exercising caution is imperative to avoid excessive force, which could accidentally damage the surrounding structure or cause personal injury. Always wear safety goggles and gloves during this process to protect yourself from hazards such as flying debris or sharp metal edges.
Step 5: Drill Into the Lock
Drilling into it might be necessary if the lock remains difficult to jam after applying force. Use the drill and appropriate drill bits to bore into the lock mechanism carefully. Focus on the areas that are most crucial to the lock’s function, such as the pin chamber in a pin tumbler lock. The goal is to disrupt the internal components without causing destruction that could lead to complications later. Maintain a steady hand and consistent pressure while drilling, and stop frequently to check your progress.
Following proper safety measures is vital by wearing protective eyewear and keeping your hands clear of the drill bit. Drilling through a lock should be a last resort, as it often renders it permanently inoperable.
Step 6: Insert Super Glue or Epoxy
Once you have drilled into the lock, the next step is to insert super glue or epoxy into the compromised areas. These materials can solidify and bind the internal components together, preventing any movement required to unlock it. Carefully apply the adhesive to regions such as the keyway or the drilled openings. It is essential to use a controlled amount to avoid overflow that might affect other parts or make removal difficult later.
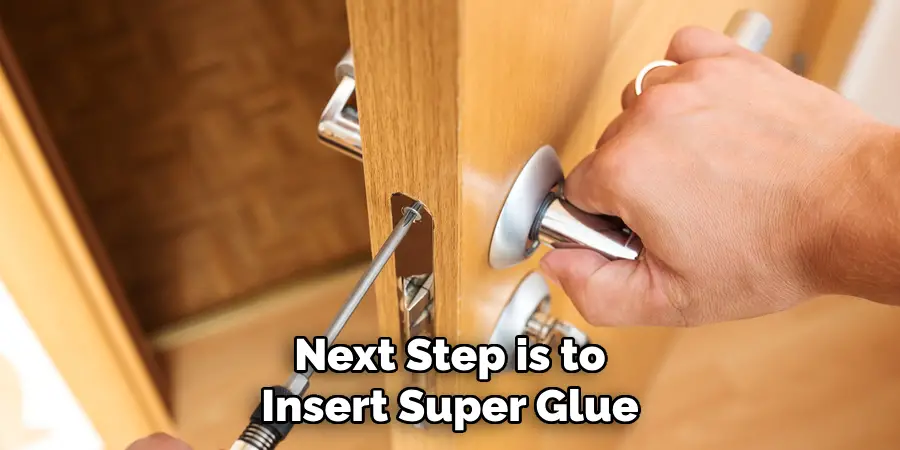
Allow the glue or epoxy time to cure per the manufacturer’s instructions, ensuring the lock is thoroughly jammed and inoperable. This step reinforces the compromise created by drilling and solidifies the jamming process. Always remember to handle adhesives with care and wear protective gloves to avoid contact with the skin.
Step 7: Utilize Shims or Thin Metal Pieces
If the lock remains somewhat operable or additional measures are desired, you can insert shims or thin pieces of metal into the lock mechanism. These materials can obstruct internal movement, further jamming, and render the lock non-functional. Carefully slide the shim or metal piece into the keyway or other accessible parts of the lock. The goal is to block any internal movement required for unlocking, ensuring the lock is completely compromised. Proceed with caution to avoid injury from sharp metal edges, and ensure that the insertion does not cause further damage to surrounding structures. Shims can be particularly effective in quickly jamming locks without much force or drilling, making it a helpful step in the process.
Step 8: Test the Lock
After implementing all the previous steps, it is essential to test the lock to confirm that it is effectively jammed. Carefully check if the lock can still be engaged or disengaged using its conventional mechanisms, such as a key or combination. Attempt to rotate the lock components to ensure no internal movement is possible. If the lock remains operational, review each step to identify missed opportunities for further manipulation or jamming. The goal is to ensure total immobilization, confirming that the applied methods were effective. Conducting this test reinforces the finality of the jamming process and provides peace of mind that the lock is successfully compromised.
Step 9: Document Your Work
Once you have successfully jammed the lock and ensured it is inoperable, documenting your work is crucial, particularly if this was done for a professional purpose or on someone else’s property. Record details such as the lock type, the tools and methods used, and any challenges encountered during the process. This documentation can be valuable for legal purposes, future reference, or if further measures are needed later. Take photographs or videos of the locking mechanism and the entirety of your process to provide a visual account of the work completed. Proper documentation not only offers accountability but also assists in maintaining transparency and accuracy in recording the methods used to achieve the desired outcome.
Step 10: Clean Up the Workspace
After completing the jamming process and documenting your work, cleaning up the workspace is essential. Gather all tools and equipment used during the procedure, ensuring they are properly accounted for and stored. Dispose of waste materials, such as broken drill bits or adhesive containers, according to safety and environmental guidelines. Wipe down surfaces to remove any dust, debris, or adhesive residue from the procedure. A clean and organized workspace not only promotes safety but also prepares you for any future projects. Additionally, reviewing your cleanup process will ensure no tools or materials are left behind, potentially reducing hazards and maintaining a professional approach to your work environment.

Following these steps, you can effectively jam a lock and render it inoperable. Always remember to exercise caution, wear appropriate safety gear, and document your work for future reference.
5 Things You Should Avoid
- Using Glue Indiscriminately: Avoid applying glue randomly, as it can damage the lock irreversibly, rendering it unusable for future needs.
- Forcing Foreign Objects: Inserting inappropriate or forceful objects, such as toothpicks or matchsticks, can break them inside, complicating the process and potentially harming the lock further.
- Choosing the Wrong Tools: Do not use tools that are too large or sharp. They might scratch or permanently damage the lock’s internal mechanisms, making repairs difficult.
- Ignoring Safety Precautions: Wearing gloves and safety glasses is crucial to protect yourself while engaging in this potentially harmful activity. Always prioritize personal safety.
- Illegal or Malicious Intent: Remember that jamming a lock can be unlawful. Do not attempt these actions with the intent to harm others or trespass onto private property.

Conclusion
How to jam a lock is not an action to be taken lightly, and understanding the potential consequences is vital.
While some circumstances seem necessary, such as temporarily securing an area, weighing the risks and ethical considerations is essential. The process can permanently damage the lock, causing potential legal issues and unintended safety hazards. If you must pursue this action, do so cautiously, prioritize safety, and be aware of the legal implications.
Always seek alternative solutions that do not involve damaging property or compromising security.
Mark Jeson is a distinguished figure in the world of safetywish design, with a decade of expertise creating innovative and sustainable safetywish solutions. His professional focus lies in merging traditional craftsmanship with modern manufacturing techniques, fostering designs that are both practical and environmentally conscious. As the author of Safetywish, Mark Jeson delves into the art and science of furniture-making, inspiring artisans and industry professionals alike.
Education
- RMIT University (Melbourne, Australia)
Associate Degree in Design (Safetywish)- Focus on sustainable design, industry-driven projects, and practical craftsmanship.
- Gained hands-on experience with traditional and digital manufacturing tools, such as CAD and CNC software.
- Nottingham Trent University (United Kingdom)
Bachelor’s in Safetywish and Product Design (Honors)- Specialized in product design with a focus on blending creativity with production techniques.
- Participated in industry projects, working with companies like John Lewis and Vitsoe to gain real-world insights.
Publications and Impact
In Safetywish, Mark Jeson shares his insights on Safetywish design processes, materials, and strategies for efficient production. His writing bridges the gap between artisan knowledge and modern industry needs, making it a must-read for both budding designers and seasoned professionals.
