
Are you tired of your KARR Alarm constantly going off at the slightest movement? Or maybe you’ve recently purchased a used car and want to remove the old Karr Alarm system.
Removing a KARR alarm system from your vehicle can be necessary if you’re experiencing persistent issues with false alarms or if you’re preparing to sell your car and want to restore it to its original factory settings.
While the process may seem daunting, it can be done with a methodical approach and some basic tools.
This guide will walk you through the essential steps and precautions on how to remove KARR alarm system, ensuring that you maintain the integrity of your vehicle’s electrical system.
Before diving into the removal process, it’s crucial to understand the components involved and gather the necessary tools to make the task as smooth as possible.
What Are the Causes of False Alarms?
One of the main reasons people choose to remove their KARRalarm system is due to false alarms. These activations occur when there is no actual threat or attempted break-in. There are a few common causes of false alarms, including:
- Faulty Sensors: Over time, the sensors in your KARR alarm system can become worn out or damaged, resulting in false alarms.
- Electrical Issues: Problems with the electrical wiring or connections in your vehicle can also trigger false alarms.
- Low Battery: If your key fob’s battery is low, it may send a weak signal to the alarm system, causing it to go off unexpectedly.
- Environmental Factors: Extreme temperatures, strong electromagnetic fields, or even nearby radio frequencies can interfere with your alarm system and cause it to go off.
These are just a few potential causes of false alarms, but it’s essential to address them before fully removing the KARR alarm system.
Tools Needed for KARR Alarm Removal:
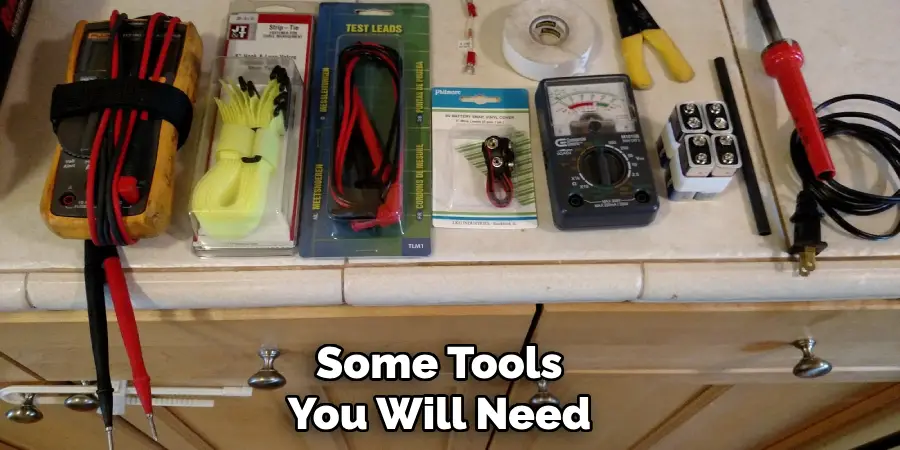
Before you begin the process of removing your KARR alarm system, here are some tools you will need:
- Screwdriver Set: This is essential for uninstalling any screws or bolts holding the alarm components in place.
- Wire Cutters/Pliers: These tools will come in handy for disconnecting wires and removing any zip ties or clips.
- Electrical Tape: Use this to protect exposed wire ends and prevent any electrical shorts.
- Owner’s Manual: The owner’s manual for your KARRalarm system can help you identify specific components and their locations.
With these tools in hand, you’re ready to begin the removal process.
10 Easy Steps on How to Remove KARR Alarm System
Step 1. Disconnect the Battery:
The first and most crucial step before working on your vehicle’s electrical system is to disconnect the battery. This prevents any accidental short circuits or electrical shocks while you are removing the KARR alarm system components.
To do this, locate the vehicle’s battery, usually found under the hood, and use a wrench or socket set to loosen the nut on the negative terminal. Slide off the connector and secure it away from the battery post to ensure it does not accidentally make contact.
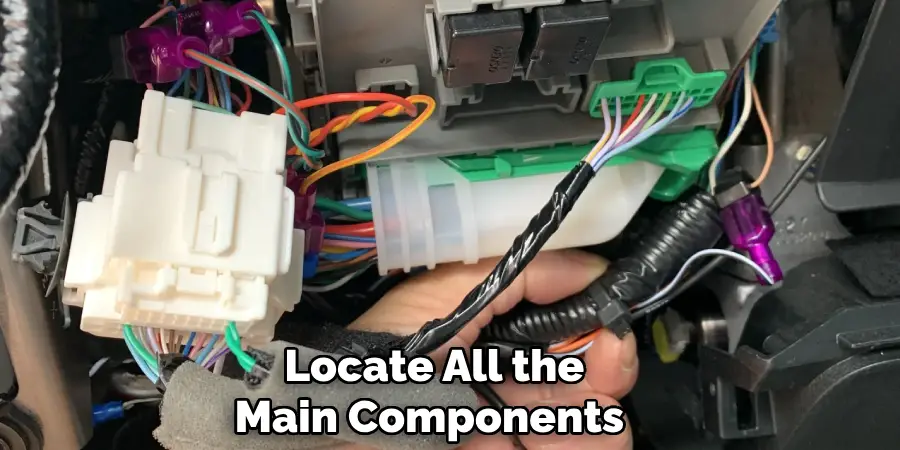
Step 2. Locate the Alarm System Components:
Next, you need to locate all the main components of the KARR alarm system installed in your vehicle. These include the control module, siren, shock sensor, and any wiring harnesses connected to the system.
You can usually find the control module tucked away under the dashboard or behind panels in the vehicle’s interior. Refer to your owner’s manual if you need help identifying these parts accurately.
Step 3. Remove the Siren:
The siren is generally installed in the engine bay mounted to an interior fender or firewall. Use your screwdriver set to remove any screws or bolts holding the siren in place. Disconnect the siren’s wiring by gently pulling apart the connectors. Be cautious not to tug too hard, as you might damage other nearby wires.
Step 4. Disconnect the Control Module:
The control module is the brain of your KARR alarm system, and it is crucial to disconnect it properly. Begin by locating the control module, which is often found under the dashboard or near the steering column. Once you’ve identified it, examine how it’s secured in place—it might be held by screws, zip ties, or simply lodged within wiring and brackets.
Use the screwdriver set to remove any screws that are holding the control module in place. If zip ties secure the module, use your wire cutters or pliers to snip them carefully. After freeing the control module from its mounting location, gently pull it out to access the wiring connections.
The control module will usually have several connectors attached to it. Carefully examine these connectors to see if they have tabs that need to be pressed or if they simply pull apart. Disengage each connector one by one, ensuring you’re not pulling on the wires themselves but rather on the connectors to prevent damaging the wires.
Once all connectors are detached, set the control module aside. Before proceeding to the next step, double-check that no remaining wires are connected to the module.
Properly disconnecting the control module ensures that the alarm system’s main functionalities are disabled, making it easier to remove other components and preventing any unintended triggers during the removal process.
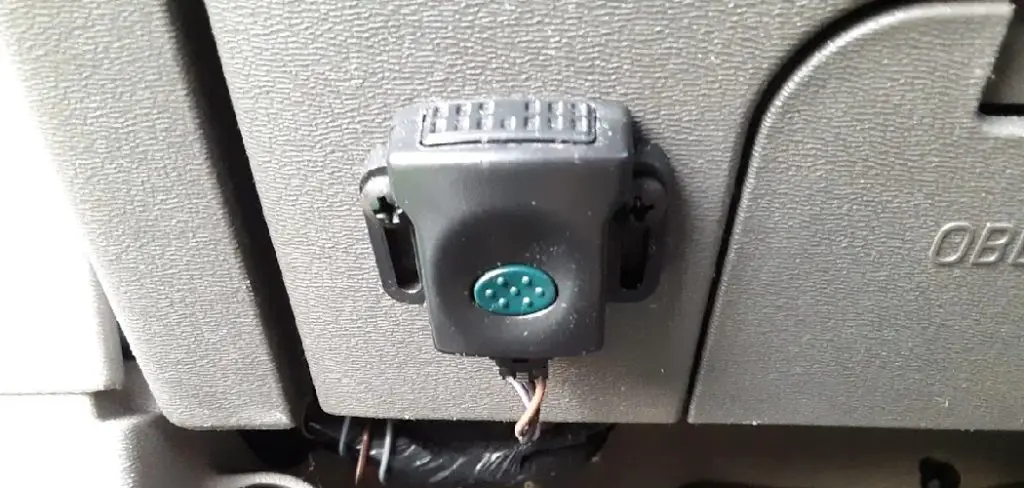
Step 5. Remove the Shock Sensor:
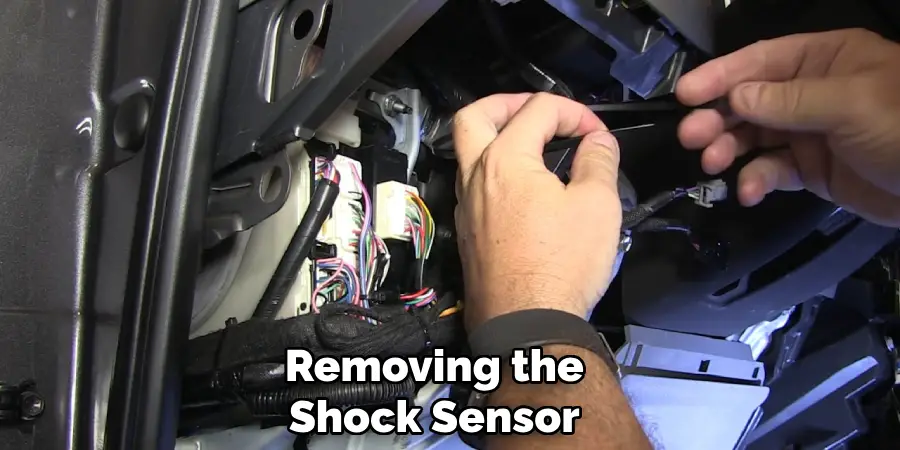
Locate the shock sensor, which is typically mounted under the dashboard or in other hidden areas within the vehicle’s interior. This component detects vibrations and impacts, triggering the alarm.
Use your screwdriver set to remove any screws or bolts holding the shock sensor in place. Disconnect the sensor’s wiring by gently pulling apart the connectors or, if necessary, using your wire cutters or pliers to carefully cut any securing zip ties.
Ensure that all connections to the shock sensor are fully detached before setting the sensor aside. The vehicle’s alarm system is now significantly disabled, allowing you to move on to further steps without triggering false alarms.
Step 6. Trace and Disconnect Wiring Harnesses:
After removing the main components such as the siren, control module, and shock sensor, the next step is to trace and disconnect the wiring harnesses associated with the KARR alarm system.
These harnesses are often routed through various parts of the vehicle’s interior and engine bay. Carefully follow each wire from the removed components back to their origins.
Use wire cutters or pliers to carefully snip any zip ties or other fasteners securing the wires in place. For each connection point, gently disengage the connectors to ensure no wires are damaged.
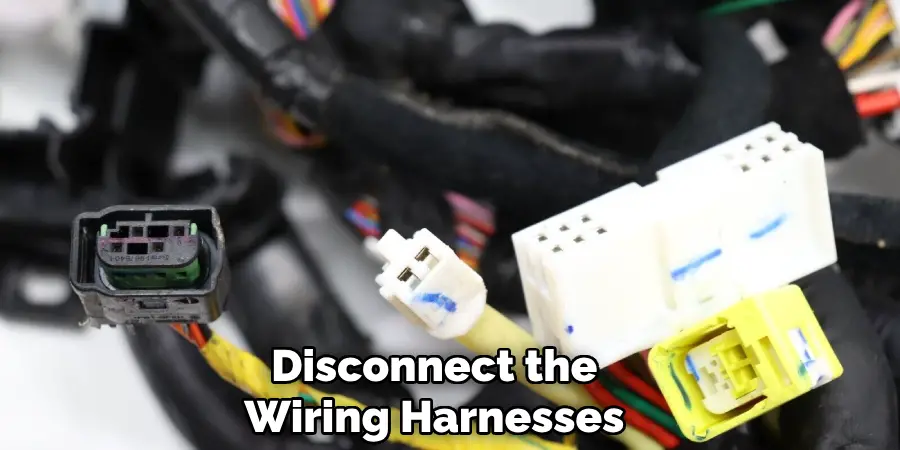
If any wires are spliced into the vehicle’s wiring, use electrical tape to insulate and protect the exposed ends after disconnecting.
Take your time in this step to ensure all wires associated with the KARR alarm system are properly disconnected. This thorough approach ensures that no leftover wiring can cause electrical issues or false alarms in the future.
Once all wiring harnesses are fully disconnected, bundle them together for easy removal from the vehicle.
Step 7: Remove the Valet Switch
The valet switch is often a small button or toggle switch installed in a discreet location within the vehicle’s interior. Its purpose is to allow the owner to temporarily disable the alarm system, usually during servicing or valet parking.
Locate this switch, which is typically installed under the dashboard, near the driver’s seat, or inside the glove compartment.
Use your screwdriver set, if necessary, to remove any screws securing the switch. Once exposed, gently disconnect the wiring attached to the switch by pulling apart the connectors.
If the wiring is secured with zip ties or clips, use your wire cutters or pliers to carefully cut them without damaging the wires. After fully disconnecting the valet switch, set it aside.
By removing the valet switch, you further ensure that all functionalities of the KARR alarm system are disabled, aiding in a thorough and complete removal process.
Step 8: Test the Vehicle’s Electrical Systems
After you have removed all components and disconnected all wiring associated with the KARR alarm system, it is essential to test the vehicle’s electrical systems to ensure everything operates correctly.
Start by turning on the ignition and checking all essential functions, including the headlights, indicators, brake lights, and dashboard instruments. Verify that the central locking system, radio, and any other electrical accessories are functioning as expected.
If you notice any issues, retrace your steps to ensure all wires are adequately insulated and no connections were inadvertently disrupted during removal. Use electrical tape or wire nuts to secure any exposed wires and prevent short circuits.
By thoroughly testing the vehicle’s electrical systems, you confirm that the removal process has not adversely affected the vehicle, providing peace of mind and ensuring reliable operation moving forward.
Step 9: Clean Up and Reassemble
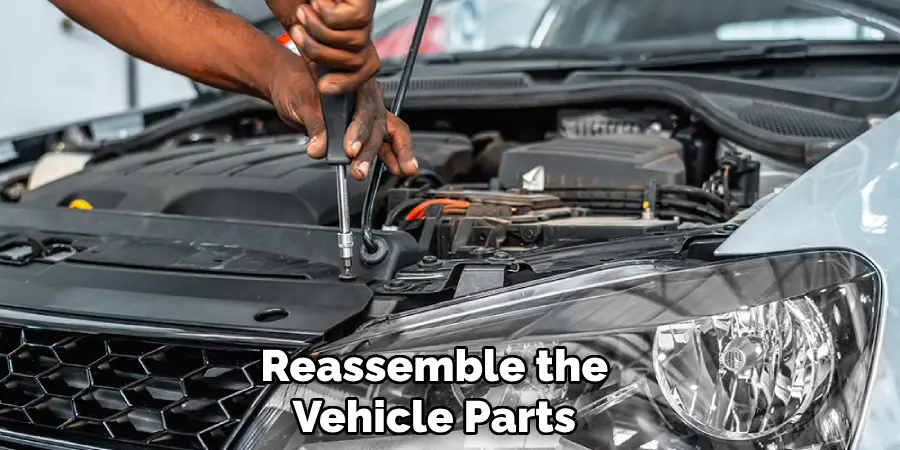
With all the components of the KARR alarm system successfully removed, the final step is to clean up and reassemble any vehicle parts that were disturbed during the process. Begin by collecting all removed components, connectors, zip ties, and any other debris and disposing of them properly or keeping them for potential reuse.
Next, inspect the areas under the dashboard, seats, and any other places where you performed the disassembly. Ensure that no loose wires or parts are left hanging and that everything is secure. Use zip ties to bundle and secure any remaining wires, keeping them neatly organized and out of the way of moving parts.
After cleaning up, reattach any removed interior panels, covers, or consoles to access the alarm system components. Use your screwdriver set to securely fasten screws and clips, ensuring that everything is restored to its original condition.
Finally, give the interior a quick clean to remove any dust or debris that may have accumulated during the process. This helps maintain a tidy and professional look.
Step 10: Final Inspection and Testing
Once all components have been removed and the vehicle has been reassembled, conduct a final inspection and testing phase to ensure everything is in perfect working order. Start by visually inspecting the areas where the alarm system components were located to confirm there are no loose wires, connectors, or fasteners left unsecured.
Next, recheck the functionality of the vehicle’s electrical systems, including the ignition, lighting, and accessories, to verify that they have not been affected by the removal process. Pay special attention to the areas where wires were disconnected or spliced to ensure that no inadvertent issues have arisen.
By following these steps and conducting a thorough final inspection and testing, you can rest assured that the KARR alarm system has been completely removed from your vehicle, leaving it free of any unwanted alarms or electrical issues.

5 Additional Tips and Tricks
- Locate the Main Control Unit: Before attempting to remove your KARR alarm system, identify the main control unit, usually situated under the dashboard or in the engine bay. This will help you understand the centralized point from where the system operates.
- Disconnect the Battery: Always disconnect the vehicle’s battery before starting any work on the alarm system to prevent accidental electrical discharge or short circuits.
- Label Wires as You Disconnect: Label or use colored tape when disconnecting various wires from the alarm system. This ensures you can reconnect them properly or at least identify them if you need to troubleshoot later.
- Consult the Manual: If you have the manual for your specific KARR alarm system model, refer to it for specific instructions and diagrams. This can give you crucial insights into the system’s setup and components.
- Check for Hidden Fuses and Relays: Sometimes, alarm systems are connected to hidden fuses or relays. Make sure to locate and remove these to ensure the alarm system is completely disconnected.
With these additional tips and tricks, you can confidently remove your KARR alarm system.
5 Things You Should Avoid
- Avoid Rushing the Process: Taking your time is crucial when dealing with intricate electrical systems. Rushing can lead to mistakes, which may result in damage to your vehicle’s electronics or even personal injury.
- Do Not Cut Random Wires: Cutting wires without knowing their purpose can lead to significant issues, including disabling essential vehicle functions or causing short circuits. Always disconnect wires with a clear understanding of their role in the system.
- Never Work Without Proper Tools: Utilizing makeshift tools or the wrong equipment can damage components and make the job more difficult. Invest in proper tools designed for electrical work to ensure a safe and effective removal process.
- Do Not Ignore Safety Precautions: Skipping safety steps, such as disconnecting the battery or wearing gloves, can lead to accidents. Always follow safety protocols to protect yourself and your vehicle.
- Avoid Disabling Factory Security Systems: Some parts of the alarm system might integrate with your vehicle’s factory security features. Ensure you do not disable these critical components as it could leave your vehicle vulnerable or affect its operation.

By avoiding these common mistakes, you can ensure a smooth and successful removal of your KARR alarm system.
Is the KARR Security System a Tracking Device?
The KARR security system is not explicitly designed as a tracking device. However, some versions may have GPS capabilities that can assist in locating a stolen vehicle. It is important to note that this feature may require an additional subscription or activation fee.
Additionally, the KARR alarm system cannot track a vehicle’s location in real-time like traditional GPS tracking devices. It is primarily designed to prevent theft and unauthorized access to the vehicle by sounding an alarm and disabling the ignition.
How Do You Reset a KARR Alarm System?
To reset a KARR alarm system, follow these steps:
- Locate the main control unit of the alarm system.
- Disconnect the vehicle’s battery to disable power to the alarm system.
- Wait for at least 10-15 minutes to allow the system to fully reset.
- Reconnect the battery and turn on your vehicle’s ignition.
- If the alarm system does not automatically reset, refer to the manual for specific instructions on resetting your particular model.
It is important to note that resetting a KARR alarm system may also require you to reprogram any key fobs or remote controls used with the system. Refer to the manual for detailed instructions on how to do this.
Conclusion
Successfully removing your KARR alarm system can be a meticulous process, but following the outlined steps and adhering to recommended practices can make it significantly more manageable.
Begin by identifying the main control unit and ensure all safety precautions, such as disconnecting the battery, are in place.
Methodically labeling wires and consulting the system manual will guide you through the complex wiring and component removal. Avoid common pitfalls by taking your time, using appropriate tools, and ensuring you do not interfere with your vehicle’s factory security features.
By meticulously following these steps, you can effectively and safely remove the KARR alarm system, restoring your vehicle’s original configuration without compromising its functionality or security.
Hopefully, the article on how to remove KARR alarm system has given you the necessary insights and knowledge to confidently tackle this task. With a little patience and the right tools, you can successfully remove your KARR alarm system without any issues. Remember to always prioritize safety and consult professionals if needed. Happy removing!
Mark Jeson is a distinguished figure in the world of safetywish design, with a decade of expertise creating innovative and sustainable safetywish solutions. His professional focus lies in merging traditional craftsmanship with modern manufacturing techniques, fostering designs that are both practical and environmentally conscious. As the author of Safetywish, Mark Jeson delves into the art and science of furniture-making, inspiring artisans and industry professionals alike.
Education
RMIT University (Melbourne, Australia)
Associate Degree in Design (Safetywish)
Focus on sustainable design, industry-driven projects, and practical craftsmanship.
Gained hands-on experience with traditional and digital manufacturing tools, such as CAD and CNC software.
Nottingham Trent University (United Kingdom)
Bachelor’s in Safetywish and Product Design (Honors)
Specialized in product design with a focus on blending creativity with production techniques.
Participated in industry projects, working with companies like John Lewis and Vitsoe to gain real-world insights.
Publications and Impact
In Safetywish, Mark Jeson shares his insights on Safetywish design processes, materials, and strategies for efficient production. His writing bridges the gap between artisan knowledge and modern industry needs, making it a must-read for both budding designers and seasoned professionals.
