
Are you tired of trying to open and close your gate with a broken or faulty latch? Don’t worry—replacing a gate latch is easy, and it only requires a few tools and some basic knowledge.
How to replace a gate latch is a straightforward task that can significantly improve the security and functionality of your gate. Whether your current latch is rusty, broken, or simply outdated, a new latch can provide a more secure closure and enhance the overall appearance of your gate. This guide will walk you through the necessary steps, from gathering the right tools to properly installing the new latch.
With a few simple steps, you’ll ensure your gate operates smoothly and securely, while also extending its lifespan.
What Will You Need?
Before replacing your gate latch, ensure you have all the necessary tools and materials. Here’s a list of items you’ll need:
- New gate latch
- Screwdriver
- Pliers
- Drill (if required)
- Screws (if not included with new latch)
- Measuring tape (if required)
Once you have all the required materials, it’s time to start replacing your gate latch!
10 Easy Steps on How to Replace a Gate Latch
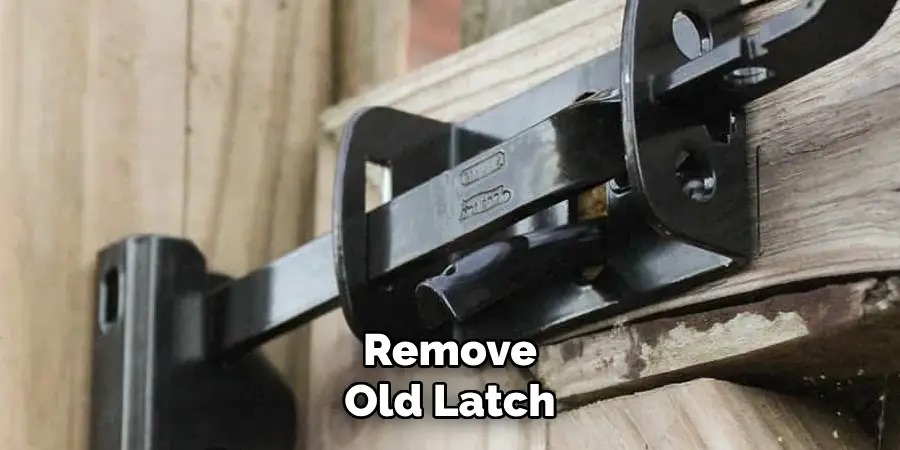
Step 1: Remove Old Latch
To begin the process of replacing your gate latch, you need first to remove the old latch. Start by examining the current latch to understand how it’s attached. Most latches are secured to the gate and the opposite post with a combination of screws. Using your screwdriver, carefully unscrew these from the gate.
As you work, keep a firm grip on the latch to prevent it from falling once the screws are removed. If the screws are rusted or corroded, you may need to use a pair of pliers to assist in loosening them. In some cases, if the screws are particularly stubborn, a drill may be required to remove them. Once all the screws are taken out, carefully detach the old latch from the gate and the gate post.
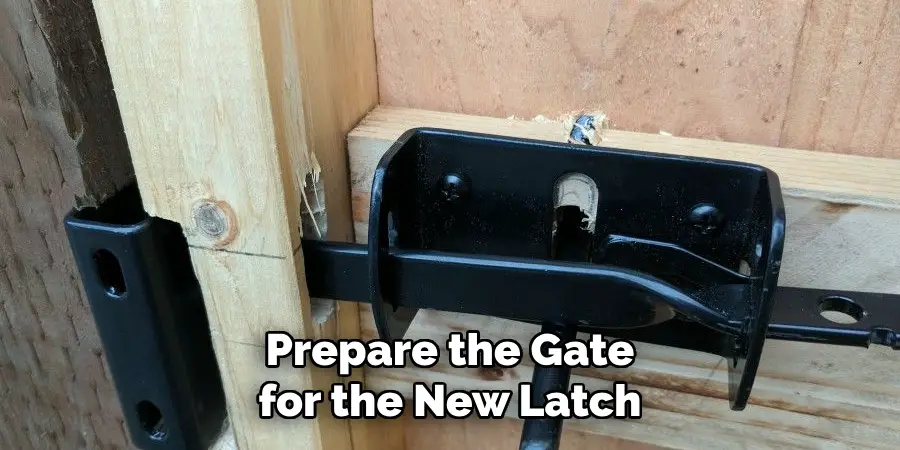
Step 2: Prepare the Gate for the New Latch
Once the old latch is removed and the area is clear of any debris or rust, it’s time to prepare the gate for the new latch. Begin by aligning the new latch with the existing holes on the gate and the gate post. If the new latch does not align perfectly, you may need to mark new drilling points using a pencil or marker. Before proceeding, double-check that the latch is level and positioned correctly to ensure smooth operation. If necessary, use a measuring tape to confirm accurate placement. This careful preparation will help avoid misalignment issues and make the installation process more manageable.
Step 3: Secure the New Latch Mechanism
With the gate and post prepared, position the latch mechanism so that its main body aligns with your previously marked holes or existing ones. Begin by inserting screws into the mounting holes on the latch and use your screwdriver to fasten them in place securely. Ensure that the latch is tightened enough to stay secure but not so tight that it can cause bending or damage to the latch’s components.
This is a crucial step to guarantee the proper function and longevity of the new latch, providing both stability and ease of use. Double-check the alignment to confirm that the latch mechanism operates smoothly without encountering any resistance or hindrance.
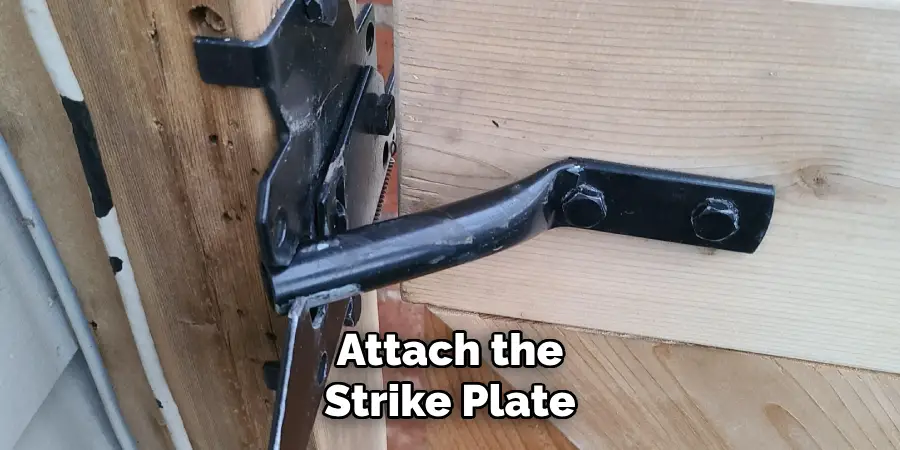
Step 4: Attach the Strike Plate
Now that the latch mechanism is securely installed, it’s time to attach the strike plate to the gate post. The strike plate is the part of the latch system that the latch itself catches onto, securing the gate closed. First, position the strike plate on the gate post to align with the latch mechanism. You may need to adjust the height or angle slightly to ensure it meets the latch correctly when the gate closes. Once aligned, mark the mounting holes of the strike plate on the post.
Using the appropriate screws and your screwdriver, secure the strike plate in place. Be cautious not to overtighten, which could warp the plate or misalign the latch. After installation, test the latch by closing the gate and ensuring the latch clicks into place smoothly and securely. Adjust as necessary to achieve an effortless operation.
Step 5: Test the Latch
After attaching both the latch mechanism and the strike plate, it’s crucial to test the latch to ensure it functions correctly. Open and close the gate several times, paying attention to the smoothness of the operation and the consistency and security of the latch’s engagement with the strike plate. The latch should engage effortlessly every time the gate closes, providing a secure closure without any struggle or misalignment.
If you encounter any issues, such as the latch not catching properly or encountering resistance, make any necessary adjustments to the alignment or tension of the components. Testing the latch at this stage helps validate the effectiveness of the installation. It prevents potential issues with gate operation in the future, ensuring that the latch provides a reliable and secure closure.
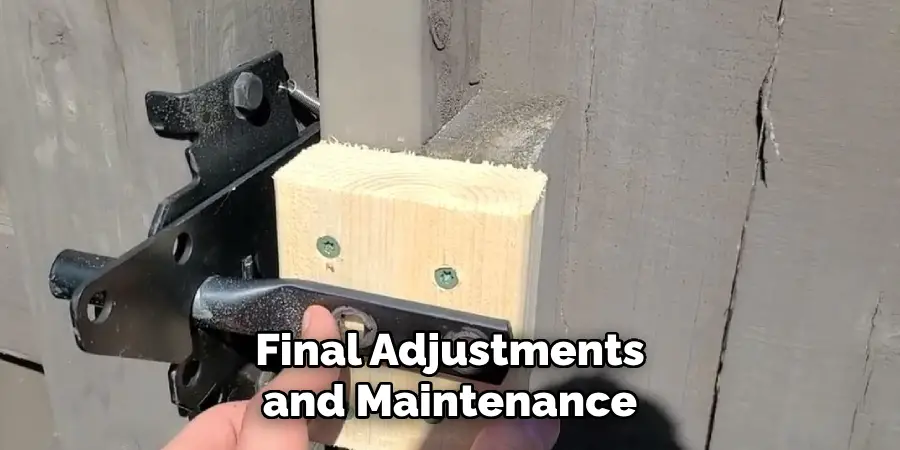
Step 6: Final Adjustments and Maintenance
Once you’ve tested the latch and ensured it functions smoothly, it’s time for final adjustments and routine maintenance checks. Inspect all screws and components to make sure they are securely fastened. Tighten any loose screws but be cautious not to overtighten them, as this could damage the latch or gate materials. Next, if the latch mechanism or strike plate is still not perfectly aligned, make minor adjustments to improve the operation.
It’s also beneficial to clean and lubricate the latch periodically to maintain optimal performance and prevent rust or corrosion from affecting the components. A well-maintained latch not only extends the lifespan of your gate hardware but also continues to provide reliable security over time. Consistent care and attention ensure that the installation remains effective and continues to meet your security and functionality needs.
Step 7: Final Inspection and Securing the Area
Once all the installation steps have been completed, a final inspection of the entire latch system will be performed. Check all components to ensure they are correctly aligned and securely fastened. Carefully inspect the area around the latch and strike plate for any possible obstructions or potential wear points that may affect the latch’s operation. It’s also an excellent time to verify that any debris from the installation process has been cleared away from the gate area, which could otherwise interfere with the gate’s functioning. Lastly, ensure that children or pets cannot tamper with the latch system for safety.
Step 8: Monitor and Review Usage
After completing the installation and thorough inspection, it’s essential to monitor the gate’s usage over time to ensure long-term effectiveness and security. Regularly observe how the latch system functions under typical conditions, particularly during high usage periods. Look for signs of wear or weakening in the latch components or the gate structure. Address any developed issues promptly to prevent more significant problems down the line. Gathering feedback from those who frequently use the gate can also provide valuable insights into the latch system’s performance and highlight areas needing improvement. Periodic assessments and proactive maintenance will help maintain the integrity of the latch system, ensuring it continues to meet your needs efficiently.
Step 9: Safety Tips for Gate Latch Usage
With the gate latch installed and tested, adopting safety measures to prevent accidental injuries or damage is vital. Always ensure the latch is fully engaged when the gate is closed to avoid it swinging open unexpectedly. Educate children on proper gate usage to prevent them from playing with or forcefully handling the latch, which could lead to wear or breakage. If the gate provides security to a pool or other hazardous area, verify that the latch mechanism is high enough or equipped with a childproof lock to prevent unauthorized access. Finally, routinely check the surrounding area for hazards that could interfere with the gate’s operation or cause injury, such as loose debris or sharp edges.
Step 10: Regular Maintenance Schedule
To ensure the long-lasting functionality and security of your gate latch system, it’s essential to establish a regular maintenance schedule. Plan routine inspections monthly or quarterly, depending on the gate’s frequency of use and exposure to environmental factors. During these inspections, check for any signs of rust, corrosion, or wear on the latch and surrounding components. Clean the latch and strike plate with a suitable cleaner to remove dirt and debris, and apply a lightweight lubricant to ensure smooth operation. Tighten any loose screws, and make alignment adjustments if necessary. Keeping a record of each maintenance activity and any changes made to the system can be beneficial for tracking the system’s condition and providing insight into future issues.
Following these steps, you can install and maintain a secure and functional gate latch system.
Conclusion
How to replace a gate latch is an essential task for ensuring the security and functionality of your gate.
This process involves several important steps, including choosing the right type of latch for your specific needs, carefully removing the old hardware, accurately positioning the new components, and securely attaching them. Testing the latch thoroughly and making necessary adjustments ensures smooth operation and reliable performance. Regular maintenance and adhering to safety tips prolong the life of the latch system, prevent future issues, and secure the area effectively against unauthorized access.
Following the outlined steps and paying attention to detail throughout the installation and maintenance process, you can achieve a successful gate latch replacement that meets your security and functional requirements.