
If you’re like me, you probably have a few Arlo Essential Cameras around your house. These cameras are great for keeping an eye on things when you’re not home, but what do you do when the battery runs out? This blog post will show you how to remove battery from Arlo essential camera.
Remember that this process may vary depending on which Arlo camera model you have. Keep in mind that this process will void your warranty. Always consult with the manufacturer before attempting any repairs or modifications to your device. Let’s get started!
When Should You Change the Battery From the Arlo Essential Camera?
Most Arlo Essential Cameras use AA batteries. Depending on how often the camera is used, you may need to change the batteries every few months. The battery may also need to be changed if the camera is not used for an extended period. If you notice the battery life has decreased, it’s probably time for a change. Or if you see the Arlo camera not turning on, this may be caused by a weak or dead battery.
If your Arlo camera battery dies, you’ll need to know how to remove the battery so that you can replace it. This process is different for each Arlo camera model, so consult your manual or the manufacturer’s website for specific instructions. In general, however, the process is relatively simple and only takes a few minutes to complete.
Step-by-Step Guide: How to Remove Battery From Arlo Essential Camera
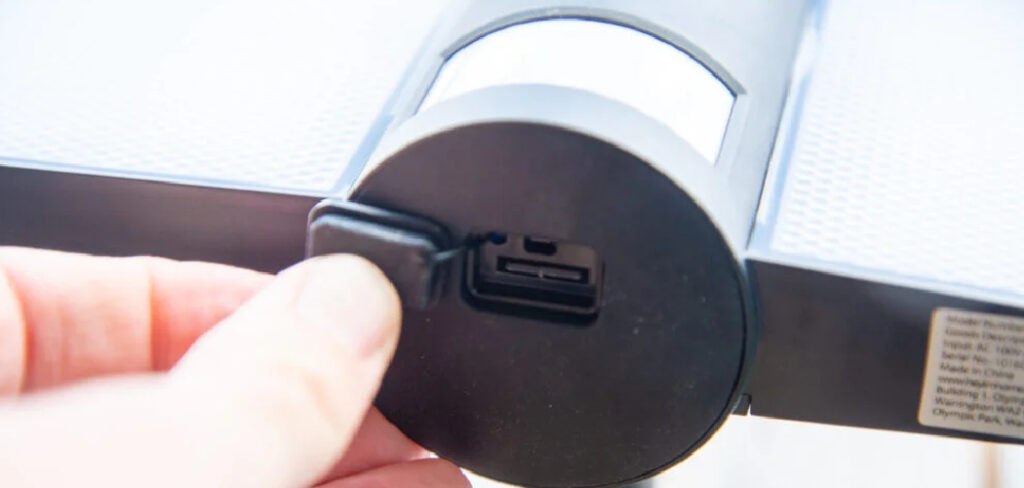
Step 1: Locate the Battery Compartment.
The first thing you need to do is locate the battery compartment on your Arlo Essential Camera.
The battery compartment on the Arlo Essential Camera is located at the bottom of the camera. You will see the charging port and a small door that reveals the battery. Remove any protective casing if applicable. The door should easily open with a small amount of pressure.
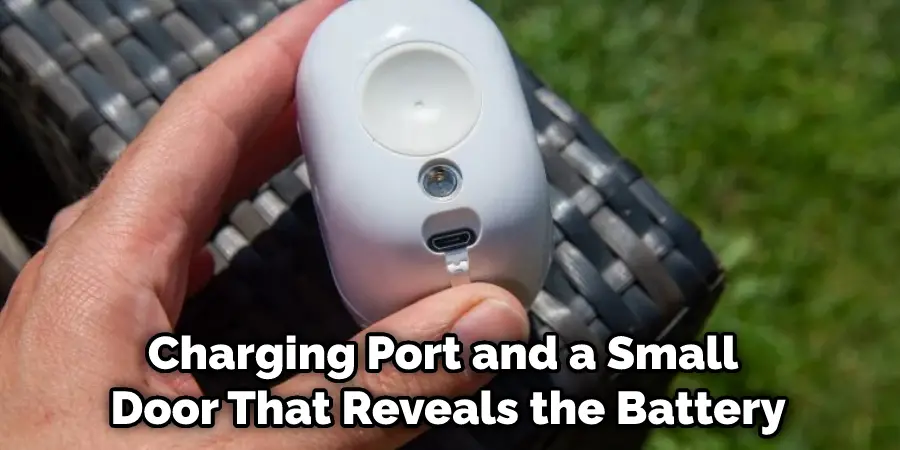
Step 2: Open the Battery Compartment Door.
Once you have located the battery compartment, open the door to reveal the battery. Be careful when opening the compartment door, as the battery is fragile and can be easily damaged. You will see two metal contacts and a small plastic tab. The plastic tab will be in the battery compartment if your camera is new.
It is essential to make sure that you have a replacement battery ready before removing the old one. This will minimize downtime for your camera and ensure you have a working battery when needed.
Step 3: Remove the Battery.
Carefully remove the battery from the compartment. You may need to use a small flathead screwdriver to help pry the battery out if it is stuck. Be careful not to damage the contacts or break the plastic tab that holds the battery in place. If your camera is still under warranty, do not attempt to remove the battery yourself, as this will void the warranty.
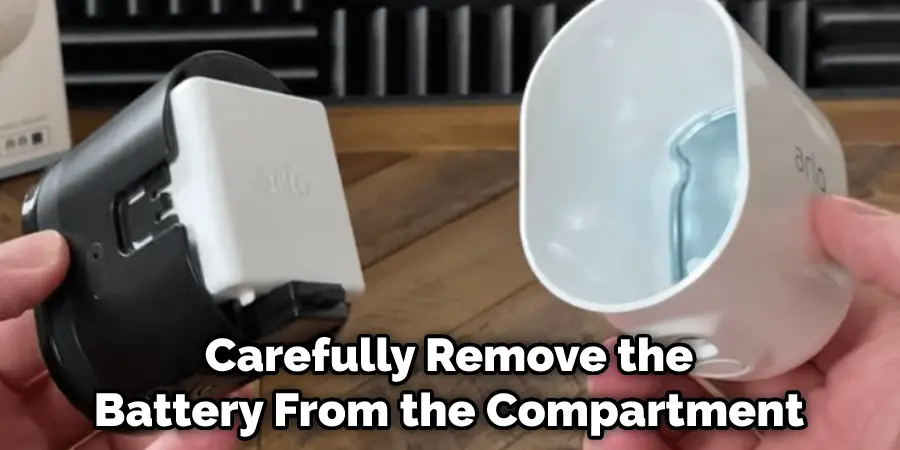
You can now dispose of the old battery or recycle it according to your local guidelines. Make sure to properly dispose of batteries as they can be hazardous to the environment. Otherwise, you can keep the battery as a spare in case you need it in the future.
Step 4: Replace the Battery.
To replace the battery, insert it into the compartment with the positive end facing up. Gently press on the battery until it clicks into place. The camera will not power on if the battery is not inserted correctly. If you want to check that the battery is inserted correctly, you can open the door and check the alignment of the contacts.
It is essential to use the correct type of battery for your Arlo Essential Camera. Using a different type of battery may damage the camera and void the warranty. You can find the recommended battery type in your camera’s manual or on the manufacturer’s website.
Step 5: Close the Battery Compartment Door.
Once the battery is inserted, close the compartment door and ensure it is secure. The camera will not power on if the door is not properly closed. While closing the compartment, carefully align the tab on the door with the slot on the camera. If the tab does not fit into the slot, gently push the door until it clicks into place.
It is essential to close the battery compartment door securely as it protects the battery from dust, moisture, and other elements. You can also use this opportunity to clean the contacts and remove any dirt or debris that may have accumulated.
Step 6: Power On the Camera.
Once the battery is installed and the compartment door is closed, you can power on your camera. To do so, press and hold the power button for two seconds. The camera will turn on and begin initializing. Once the camera is initialized, it will be ready to use. Check if a solid white LED light is on the front of the camera. If the LED is not lit, the battery may be low and need to be charged. If the LED is blinking, it indicates that the camera is connecting to a Wi-Fi network.

It is essential to fully charge the battery before using your camera, as a partially charged battery may not last long. You can use the charging cable that came with your camera or purchase a separate charger for convenience.
Step 7: Remove Battery in Extreme Cold Temperatures.
If you need to remove the battery in extremely cold temperatures, you may find it difficult as the plastic tab can become brittle and break easily. It’s best to remove the battery indoors at room temperature and then go outside to replace it. You can also use a hairdryer on low heat to warm up the battery compartment slightly before attempting to remove the battery.
It’s also essential to keep spare batteries in a warm place when not in use to prevent them from losing power or becoming damaged. This will ensure you have a fully functional and easily replaceable battery on hand when needed.
Step 8: Recharge the Battery.
Once you have removed and replaced the battery, make sure to recharge the old battery using a compatible charger. You can also use this time to clean the contacts on both the camera and battery with a soft cloth or cotton swab. This will ensure optimal performance and prolong the lifespan of your battery.
It’s always a good idea to have spare batteries for your Arlo Essential Camera, especially if you use it frequently or in high-traffic areas. This will allow you to quickly swap out batteries and keep your camera functioning at all times.
Step 9: Dispose of Old Batteries Properly.
It is essential to dispose of old batteries properly. Do not throw them in the trash as they can be hazardous to the environment. Instead, check with your local recycling center for proper disposal methods. You can also contact the manufacturer for specific instructions on how to dispose of your Arlo Essential Camera’s battery.
But remember, the best way to reduce waste is to use rechargeable batteries whenever possible. Not only are they better for the environment, but they can also save you money in the long run. So consider investing in rechargeable batteries and a compatible charger for your Arlo Essential Camera.
Step 10: Contact the Manufacturer for Assistance or Repairs.
If you encounter any issues during the battery removal process, contact the manufacturer’s customer service for assistance. If your camera is still under warranty, they may be able to provide you with a replacement or repair the camera if needed.
It’s always best to seek professional help rather than attempting to fix the issue yourself, as you may cause more damage. The manufacturer’s customer service can also assist with any other questions or concerns you may have regarding your Arlo Essential Camera.
Following these steps will ensure that you can easily remove the battery from your Arlo Essential Camera without causing any damage. Remember to always consult with the manufacturer for any repairs or modifications and dispose of old batteries properly. With proper care and maintenance, your Arlo camera will continue to keep your home safe and secure.
How Long Does An Arlo Essential Camera Battery Last?
The battery in your Arlo Essential Camera should last for several months. However, there are a few factors that can shorten the lifespan of your battery, such as:
- Cold Weather: If you live in an area with cold weather, your battery may die faster. Because the battery is constantly working to keep the camera warm, it will run out of power quickly. As the temperature gets colder, the battery will work harder and die sooner.
- Infrequent Use: If you don’t use your camera very often, the battery may discharge itself over time and need to be replaced sooner than if you use it regularly. Because the battery isn’t being used, it will slowly lose power.
- Storage: The battery may die if you store your camera for an extended period without using it. Even if you store your camera in a cool, dry place, the battery will eventually run out of power and will need to be replaced.
- Power Outages: If there is a frequent power outage in your area, the battery in your camera will work harder to keep the camera running and may die sooner than usual. Because the battery is constantly in a state of discharge, it will run out of power quickly.
Additional Tips to Extend the Lifespan of Your Arlo Camera Battery:
To extend the lifespan of your battery, we recommend:
1. Keeping your camera out of the cold weather. If you live in an area with cold weather, we recommend keeping your camera indoors. The battery will last longer if the camera isn’t constantly working to keep itself warm.
2. Turning off motion alerts. If you don’t need to be notified every time, there’s movement in front of your camera, and you can save some battery life by turning off motion alerts.
3. Adjust your recording settings. You can lower the resolution and frame rate settings to conserve battery power if you don’t need to record video at the highest quality.
4. Use the Arlo Solar Panel. We recommend using it to keep your camera battery charged if you have an Arlo Solar Panel. The solar panel will help extend the life of your battery by keeping it topped off.
5. Checking the battery level regularly. It’s a good idea to check it regularly to know when it needs to be charged. You can check the battery level using the Arlo app.
6. Keeping your camera software up to date. The Arlo camera releases regular camera updates that can help improve performance and battery life. Make sure you keep your camera software up to date for the best experience.
7. Enabling the power saving mode. In the Arlo app, you can enable the power-saving mode to help conserve battery life. In addition, the power-saving mode will disable certain features, such as motion alerts and video recording, when your camera isn’t in use.
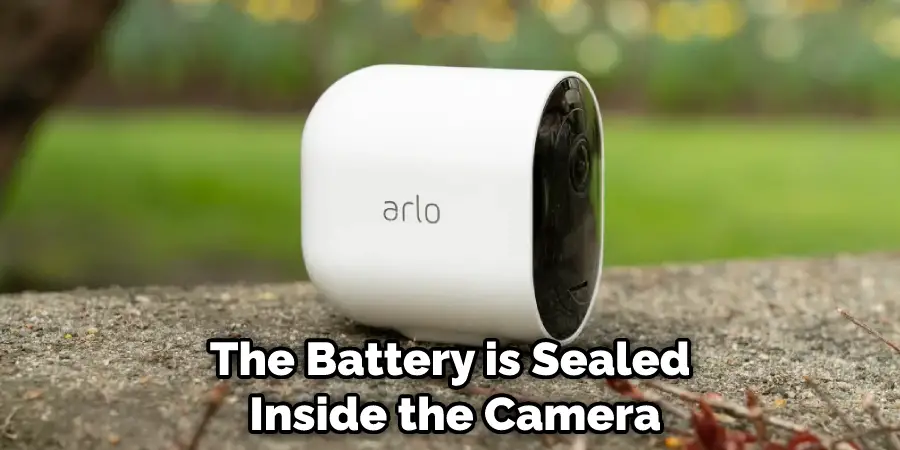
Do Arlo Essential Cameras Have a Removable Battery?
Arlo Essential Cameras do not have a removable battery. The battery is sealed inside the camera and cannot be removed. If your Arlo Essential Camera needs a new battery, you must purchase a new camera. Additionally, you must ensure that your Arlo Essential Camera is turned off before attempting to remove the battery.
There is a button next to the Arlo camera charging port; press the button to remove the camera battery. If you have any questions about how to remove battery from Arlo Essential Camera, please contact Arlo customer support for assistance. Thank you for choosing Arlo!
Why is My Arlo Essential Not Charging?
If you’re experiencing issues with your Arlo Essential not charging, you can try a few things. First, ensure the camera is turned off and the power cord is unplugged. Next, remove the battery cover and take out the battery.
Next, inspect the camera and battery contacts to ensure they’re clean. If they’re not, clean them with a dry cloth. Finally, reinsert the battery and replace the cover. If your camera isn’t charging, don’t hesitate to get in touch with Arlo support for additional assistance.
Why is Arlo Essential Not Responding to Remote?
If you find that your Arlo Essential is not responding to the remote control, it may be because the batteries need to be replaced. You’ll know the batteries need to be replaced when the LED on the camera blinks red four times. To remove the battery from your Arlo Essential, locate the battery compartment on the bottom of the camera.
The battery compartment is located under the removable panel. To remove the panel, use a small Phillips head screwdriver to remove the two screws that secure the panel. Once the screws are removed, the panel will come off easily. Locate the battery compartment and open it. You should see two batteries inside. Remove both batteries and replace them with new ones. Close the battery compartment and replace the panel.
Frequently Asked Questions:
Q: How Long Does It Take for an Arlo Essential Camera to Fully Charge?
A: It takes approximately four hours for the battery in an Arlo Essential Camera to fully charge. You can monitor the battery level in the Arlo app to know when it’s fully charged. Keep in mind that the charging time may vary depending on external factors like temperature and power source.
Q: Can I Use a Third-Party Battery for My Arlo Essential Camera?
A: We recommend using only official Arlo batteries for your camera. Using third-party batteries may damage the camera and void the warranty.
Q: How Often Do I Need to Replace the Battery in My Arlo Essential Camera?
A: The battery life of your Arlo Essential Camera will vary depending on usage and external factors. However, on average, you may need to replace the battery every three to six months. Be sure to follow our tips for extending the lifespan of your battery to help prolong its usage.
Q: Can I Use My Arlo Essential Camera While It’s Charging?
A: Yes, you can still use your Arlo Essential Camera while it’s charging. However, keep in mind that the charging time may be longer if the camera is in use.
Final Words
Battery removal from the Arlo Essential camera is a simple process that can be accomplished in a few minutes. First, remove the screw on the back of the camera using a Phillips head screwdriver. Next, slide the battery cover off of the camera. The battery will then be accessible and can be removed by sliding it out in the direction of the arrow.
To replace the battery, follow these same steps in reverse order. Reattach the screw to keep your camera secure after replacing the battery. We hope this guide on how to remove battery from arlo essential camera was helpful. If you have any further questions, don’t hesitate to contact Arlo customer support for assistance. Thanks for reading!